|

My first adventures in glass were by way of the stained
glass craft. FritFlowers were created in approximately 1995
when I began fusing glass. It took many months of
experimentation to achieve the lines, which mimic the lead
lines of stained glass. Like so many things, once you know
how to do something it is incredibly simple no matter how
difficult the discovery process may have been.
My first thought was that I would sell FritFlowers at craft
fairs and such. But the ever-searching curious side of me
tends to just move on to the next glass challenge, and I
never really do make it to retail. So, I put the technique
away thinking I'd get back to it some day.
Seems however, that there is a growing interest in "drawing"
with glass as can be seen at the
Fusion
Headquarters
and their
Liquid Stringer line of products. Since I don't seem to
be doing anything with the technique and it is more or less
public domain I might as well share what I know about it.
Visit the FritFlower Gallery
to see finished examples.
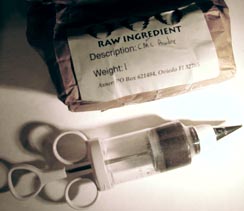
Materials Needed
Glass Frit and Powder
Cake Decorator
CMC Powder (Cellulose Gum)
Mixing Bowl
Stained Glass Pattern
Outline of Steps
-
Create a design or find a pattern
-
Cut glass to size (1/8 inch or thicker)
-
Place glass over pattern
-
Mix CMC powder, glass powder and water to a peanut
butter consistency
-
Load the cake decorator
-
Trace out the design on the glass using the decorator
-
Let dry (speed dry with fan or hair dryer)
-
Fill in pattern with glass frit
-
Fire according to defined schedule for size of sheet
your using
Detailed Instructions
Step one is easy. You can get an endless supply of
designs from stained glass suppliers. There are many pattern
books available. You can use a copier to enlarge or a
digital camera to shrink the images, and of course you can
just draw your own cartoon.
Step two and three needs no discussion other than the
base glass must be compatible to your frit and no less than
1/8 thick. Iridescent glass isn't the best choice for this
technique unless it is on the shelf side during firing.
Transparent glass works best so that you can see the pattern
through the glass.
In step 4 you create the glass paste. CMC powder is
used extensively in the food industry. It is a gum additive
for thickening products. It has great properties for glass
drawing such as:
-
Really sticks to glass well.
-
Can be stretched when applying so you get a thinner or
thicker line depending on your needs.
-
Can be reused days after it is mixed. Just add a bit of
water to thin it back to a good application consistency.
-
Does not have an application "pot life". You can work as
slow as you want.
-
Does not run. If your consistency is correct it will not
run or spread, and will leave a nice crisp line.
-
Burns off completely and leaves no telltale residue.
The mixing ratio is 9.5 tablespoons of water to 2.5
tablespoons of CMC to 13 tablespoons of glass power. This
will make enough for approximately 12 8x10 designs.
You can test your consistency by placing a small amount of
the paste into the cake decorator tip, then pressing lightly
to force the paste out of the end of the tip. The line that
you draw should stay firm and not spread out, and it should
flow out of the tip with very little effort. If you have to
force it, then you're too thick.
Step five is the true test where you load the
decorator up and see if it flows out nicely. If you have to
force it out, then unload the paste and add a few drops of
water and repeat the tip test above. If it is too thin then
add just a little more CMC, just a pinch or two depending on
the size of your mix, and how thin it happened to be. CMC
comes in several sizes. I ordered a small bag from
Axner Pottery Supply.
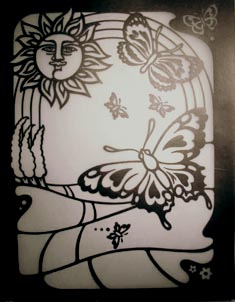
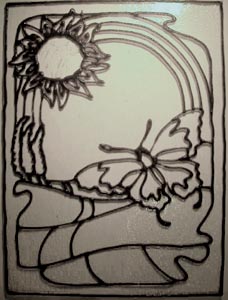
Tracing out the design in step six is a breeze if the
mix is correct. Play with the stickiness and elasticity of
the paste to your advantage when drawing. It might be tuff
getting real fine detail. If you used a #1 decorator tip and
the mix was just right you might be able to get the detail
in the Sun's face for example. A #2 tip was used in the
examples.
When drying in step seven you can clean up the lines.
If they are not quite right or got fat in a few places you
can push them around a little while still wet. If you wait
until the lines are completely dried, then you can actually
carve the lines to make them thinner or more flowing and
elegant.
Taking carving to another level, you could actually put
paste all over the whole piece of glass and carve out a
design!
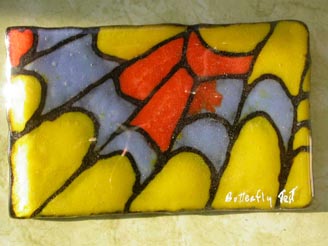
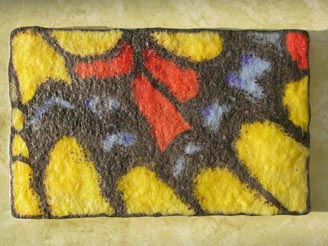
Step eight is completely open. Have fun, it is just
like a coloring book. Here are some examples of the
FritFlowers before firing.
The firing step doesn't have any special instructions. It
should be fired just like any other project. The schedule I
use is:
| Ramp |
Time |
Temp |
| 610 |
4 |
1225 |
| Full |
20 |
1500 |
| Full |
40 |
960 |
| 200 |
0 |
600 |
Like any firing schedule this is just a guideline. I ramp by
610 an hour and hold for 4 minutes at 1225 degrees F. Then
ramp at full power to 1500 and hold for twenty minutes. I
look at the glass at during this segment and as soon as the
glass has fully fused flat I crash the kiln to 960 F. I
don't usually need to stay at 1500 for the full 20 minutes.
From 960 I bring the kiln down 200 per hour to 600 degrees,
and then turn off the kiln and let it come down to room
temp.
If you have questions you can reach me at via
email.
The following are some questions from visitors of this page.
I'm very excited to
try your frit flowers, but have a couple questions. I
ordered the CMC powder and understand how to make the
lines, but when it comes to the "coloring" part of
filling in the lines:
What size frit does
one use?
Is it dry, mixed
with water, or mixed with the cmc powder?
I'm just starting out
so I don't have tons of frit, but I do have 6 or 8
colors of powdered glass and a 40 pound bucket of a
larger size (not powder, but not huge) clear. Could I
mix the clear with the powders to do the "coloring"
with?
To answer the
questions...
FRIT SIZE - Any size of
any compatible glass frit will work (compatible with
your base glass also, of course). The outcome will be
different depending on what frit sizes and what frit
combinations you try. There is no best combination. It
it up to your personnel taste. One good combination is a
#2 or #3 frit of light value like transparent yellow,
and then sift overtop of that frit by adding a dark
valued transparent powder like orange. The orange will
fall between the cracks of the frit, yielding a nice
value/hue changing pattern. Instead of transparent
orange try an opaque white or orange or all three.
Before mixing your
colors you MUST do color tests first. The colors you
choose might just turn to 'mud' when fused. If you don't
have the patience to color test, then buy Bullseye's
color mix chart. A quick way to test is just to make a
bead of your chosen glasses using a torch. If you like
the mix, then it will probably make a good FritFlower.
Don't forget that you
can really kick-up your design potential by mixing the
opaque powders to form new colors that are not in the
Bullseye color palette. You might have seen this on my
"about fusing" page.
http://jimbolesdesigns.com/aboutFusedGlass.htm
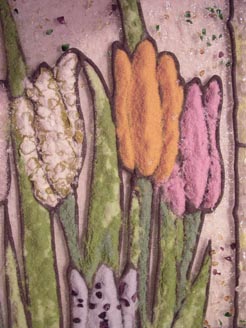
FILLING IN THE COLOR -
You don't need to use frit at all. You could use all
powders. If you did this then it is best to "wet pack"
the powder once in place. That is, apply it by
"drizzling" it in place with your finger tips, or, to be
more precise load up a decorator with powder, and then
tap the decorator when the tip is over the area to be
colored. The powder will fall neatly from the decorator
into place. (Wear a mask). You will then mist the
finished piece with thinned Fuser's or Pate glue and
push gently down on the design so that the colored
powder joins up nicely (bonds) with the black lines.
When applying dry
powders only (no frit used) wet packing is required
because the powders ball-up towards the center during
fusing, and move away from the lines, leaving the areas
next to the lines with little to no color. This however,
could be a nice effect if you want to do a second firing
and only tint the more clear areas with another color.
I have never used the
decorator to apply the powder colors wet, but I think
someone should try this and let us know how it works. I
think this is actually a good idea and may make the
whole process more production ready. If the powder were
mixed with the CMC to the same consistency, then you
would apply the color the same way as you do the lines.
It would be a very neat (i.e. tidy) method and would be
wet packed without the spaying step. For production
purposes, you would have a decorator dedicated to each
color, and store them all in a container in a
refrigerator when not in use. I'm guessing that you
could pull them out of the frig a week or so later and
make another batch.
Using just clear frit
and powders will work, but I would suggest "drizzling"
or sifting onto the base glass before adding the frit, and then after adding the frit add more powder
(on top of the frit), insuring good color saturation.
Both transparent and opaque powders work fine and form a
nice mottle pattern around #3 sized frit when it melts
down. It is good to mix similar hues both for color
gradations and for color compatibility. This avoids
mud-like mixtures, resulting from the chemical reactions
between colors that don't "like" to mix well.
Wet Packing
I've added the following information on wet packing to
help clarify ongoing questions. The following pictures
show the two sides of a test piece. The lines where
drawn and powder added as typical. However after the
powder was in place the whole piece of work was misted
with a mixture of fusing glue and water. This compacts
the powder. You can then add more powder once compacted
to the level of the lines which were drawn with the
decorator.
For this test I was working in reverse. I wanted
the ending design to show from the "shelf side" of the
firing. This results in a matt or eggshell type surface
from the texture of the fiber paper on the shelf. The
process was as follows:
-
After the lines where drawn on the glass I filled in
with power, wet packed, and added more powder, and
wet packed again.
-
I
then topped off the design by sprinkling a bit of #1
black frit along the lines so that the lines were
not as distinct, then set to dry.
-
What was the top of the design was then placed on
the self face or top down, resulting in the textured
surface seen in the picture on the right.
Working with glass paste in this manner is very much
like working in the technique of Pate De Verre. There
has been a lot published on this very old glass
technique so I won't ramble on here. I just wanted to
give some examples of wet packed powders, and to
emphasize that this process is necessary when working
with a powders-only design, and you want the powder to
remain true to your outline. By its nature powder will
gather "away" from the drawn lines when fired, and
concentrate itself in the center of a design area. This
results in clear areas next to your lines. This can be a
nice effect, but probably not what you were looking for.
As mentioned in the Q&A above, instead of applying
powders and wet packing, it could be far easier to just
apply all of your colors as a paste via the cake
decorator. It would just depend on what you are after.
Applying the colors dry enables a very controlled color
mixing. Alternatively, you could mix colors in paste and
apply by hand, repeatedly mixing in new colors to
achieve very subtle color gradations. If these
techniques of glass working intrigue you, and you
haven't done research into pate de verre, then a whole
world of literature is waiting for you.
Fusion Headquarters Liquid Stringer Medium (LSM) Product
I have recently tested the product and I was very
pleased with it. I mixed mine a with a little less water
than instructed, and used a #2 cake decorator and the
results were just fine. You might even be able to go as
low as a #1 size. CMC lines when dried are fairly tough
and can be reshaped a bit. Liquid Stringer lines where
too fragile to be manipulated after they are dried.
For production work I'm not sure how the Liquid Stringer
paste would hold up to storage and reuse. I just haven't
used it enough yet. I suspect it might be OK. Overall I
was very pleased with the product and would recommend
anyone to try it.
The following is a image provided by Gil Reynolds of
Fusion Headquarters. In this piece LSM was mixed forming
a paste for the three colors in the design. The paste
was applied in rows on a sheet of glass. While the the
paste was still wet it was combed in the same fashion as
is often done to hot glass. This is a great twist on
glass combing. Cold combing is much more
controllable, and not to mention safer than reaching
into a 1500-1600 degree kiln to do it hot.

The following are some comments provided by Gil
"... if you mix LSM and frit with no water 1 to
1, you will find that the lines are very
workable when dry. This mix is not as brittle
and hard as the
CMC
mix. It is really cool to mix 2 frit to 1 LSM,
form it into a mound or block, let it air dry
completely and then carve. It is so friendly to
the tools, yet it holds up really nice."
|
