Fell through 52 mesh - Bulleseye equivalent = Powder
mesh 52/inch - approximate Bulleseye equivalent = #0.5
mesh 30/inch - approximate Bulleseye equivalent = #1.5
mesh 20/inch - approximate Bulleseye equivalent = #2
mesh 14/inch - approximate Bulleseye equivalent = #2.5
mesh 8/inch - approximate Bulleseye equivalent = #3.5
mesh 4/inch - approximate Bulleseye equivalent = #4 (if it existed)
Counter Weights for Marble Molds.
Indexed Torch Valve Control
This sieve set is easy to make and cheap. Glass is crushed then added to the top sieve, the cap is put on and the set is shaken. Stainless steel screens on each level progressively filter out large chunks until on the bottom on the finest powder remains.
Each section is a 5-inch PVC union with a 2x5 inch piece of PVC placed into one end of the union. As seen in the picture the screen is epoxied into place inside the PVC on a small in the center of the union piece. End caps are made simply by using a 2-inch piece of PVC and gluing a circular piece of Plexiglas onto one end.
There are now 6 sections to the sieve, which can produce 7 sizes of frit from a #4 thru to powder. That is, if Bullseye made a #4 frit I would think it would be close to this size. See the following pictures.
The screening to make your own or a whole unit can be purchased below. Buying the screen is the smart think to do. These are easy to make if you have a pair of scissors that can cut mesh, and you have some epoxy glue.
This is a new set of marble molds for sale. Sizes are: 1, 1 1/4, 1 1/2, 1 3/4. An affordable beginners set at a fraction of the retail price. I'm selling the set for $50. There is a demo of how marbles are made on the main marble page if you want to make your own.
This is a marble mold making jig consisting of a 12x12 inch board with two parallel tracks, and two clamps which are made to fit the tracks. These parts can be bought at many woodworker stores or catalogs. A plunge router is needed to mount to the board and plunge through the hole in the center. A core box bit to drill out the round marble mold shape is shown next to the finished cherry mold with a shaker peg handle.
This view shows the clamps in place holding down a block of wood. This is the side view of the board as it is being held in a vice. The router can be seen mounted to the board at the bottom of the picture.
Another view of the jig in the wood vice and the router can now be seen at the top of the picture. The router will be plunged through the hole in the board and into the block being held by the clamps.
Same view but now from the router side.
These molds where designed by Drew Frits and they are cone shaped and not round bottomed. If you can picture a cone and a sphere (marble) inside of a cone, then each size marble will rest on the sides of the cone at different depths. Depending on how small or large the marble is the marble will rest in the cone lower or higher. When you turn a hot (soft) marble in the cone it will automatically become round at the point in the cone where it rests. Consequently a singe cone mold can shape any number of sizes of marbles.
I've added plumb bobs as counter weights to the ends of the mold. The weight of the glass of 3 inch marble is considerable, and the counter weight helps reduce some of the strain from holding the marble as it is being shaped.
Used when the working temperature is critical in torchwork. This is simply a pyrometer typically used in a kiln. It has been coated with bead release so that it does not burn up in the torch.
Having the numbers drawn on the valve control makes repeatable torch atmospheres easy to 'dial up'.
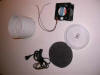
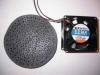
The next three pictures show the parts of a small vacuum, which holds a supply of metal leaf in place while you are torch working.


")