The First Metal Marble - 1 1/2 inches - $20 - JB0401x
The First Metal Marble - 1 1/2 inches - $20 - JB0401x
Metal Marble #2 - 2 3/16 - $20 - JB0402x
Metal Marble #2 - 2 3/16 - $20 - JB0402x
Metal Marble #6 - 1 1/2 inches - $30 - JB0406x
Metal Marble #6 - 1 1/2 inches - $30 - JB0406x
Metal Marble #7 - 1 11/16 - $30 - JB0407x
Metal Marble #7 - 1 11/16 - #30 - JB0407x
Metal Marble #9 - 1 1/2 - #30 - JB0409x
Metal Marble #9 - 1 1/2 - #30 - JB0409x
Metal Marble # 13 - 1 9/16 - $25 - JB0413x
Metal Marble # 13 - 1 9/16 - $25 - JB0413x
Metal Marble #14 - 1 11/16 - $35 - JB0414x
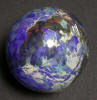
Metal Marble #17 - 2 3/16 - $75 - JB0417x
Metal Marble #17 - 2 3/16 - $75 - JB0417x
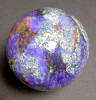
Metal Marble #18 - 2 5/8 - $75 - JB0418x
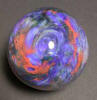
Metal Marble #19 - 2 5/8 inch - $60 - JB0419x
Metal Marble #20 - 1 3/4 - $40 - JB0420x
Metal Marble #20 - 1 3/4 - $40 - JB0420x
Metal Marble #21 - 1 11/16 - $30 - JB0420x
Metal Marble #21 - 1 11/16 - $30 - JB0420x
This one is simply copper leaf and Bullseye cobalt blue. I use Bullseye glass mostly and 90 COE glass exclusively for marbles. Copper leaf is commonly used by bead makers, and good effects can be achieved. I experimented with copper leaf for sometime, but eventually gave up on it, as I learned that thinner layers of metal were required.
This marble had enamels of different mesh sizes, copper leaf, and silver leaf applied. I gave up on enamels early on. The reduction process and the heat cycles tend to boil them and the bubbles make a mess, though they worked OK for this marble. I may return to the use of enamels at a latter point. This marble suffered a little from poor reduction techniques.
Still trying to make copper leaf work, and having problems with reduction. All of my early marbles are really nothing more than experiments in technique, and there isn't a whole lot of concentration of making them perfectly round. This focus on color over form will lead me eventually towards experimenting new shapes that I'll call Raku Rocks, and will mature when glass shapes are integrated into mix media sculptures.
Light blue is added as the base glass. I learned that each glass works differently wit the metal coating. So by having a more complex base glass color variations are greatly enhanced.
This is the first marble to use metal powders instead of copper leaf. I wasn't successful at first, because I couldn't find a way to put the powder on thin enough. If you are not careful the powders can go on many times thicker than leaf and only make a mess. A too thick application will also make the glass unstable, creating stress points that will eventually crack the glass if the stress is high enough.
I went back to leaf on this one. This one has silver leaf applied and some copper leaf. Still having problems with reduction. At this point I didn't have any sense of what to do with the reduction flame, and usually just ended up creating suit scum on the surface. Finding the correct heat level, atmosphere, metal thickness, time in flame, and location in the flame was very frustrating.
This was one of the first that was a little pleased with. The differences in base glass are coming through as textural/pattern elements as well as shifts in hue. I'm learning to keep the glass away from being too close to the front of the torch were the flame is too "dirty".
I noticed on #17 that if the leaf was applied to a rough surface then it would form different patterns. I experimented with applying the leaf on top of a surface where frit had not fully melted in smooth. Still having reduction problems. Applied aventurine for sparkle, which I believe is ground chrome.
Experimented with enamels a little bit again and metal powders, but still having reduction problems, and cannot get the metal to 'float' on the surface. If you heat too much the metal dissolves into the glass. It will change the glass color by tinting it. But this is not the effect I'm looking for. If the metal is too thick on the surface, then it will be just be a dark uninteresting spot on the glass. There is a very delicate stage where the metal is neither dissolved into the glass, nor is it sitting above the surface of the glass, but is floating on the surface. It is integrated into the glass, but not dissolved into it. At this point I decide that I need to see more detail as I'm making the marble, and set up a magnifying lens in front of the torch.
Marbles #20 and 21 are done to compare the difference between white gold and silver.
Marbles #20 and 21 are done to compare the difference between white gold and silver.
I ended this series concluding that enamels if used had applied after all other metal work was done. Some metal leaf was too thick for my approach, and that my main obstacles remaining was obtaining a consistent reduction technique and learning how to apply the thinnest possible metal layer. I began to think in terms of metal washes or glazing techniques used by ceramicists. Having taken a Raku class it finally dawned on me that I had a lot to learn from the few artisans who work the borderline between glass working and ceramics. With that thought I also realized just how much there remained to learn.